Sunday, December 7, 2014

Generate custom reports using WSO2 Governance Registry

WSO2 Governance Registry has many features that helps users to store and manage different types of data including Service metadata, WSDLs, Word Documents, PDF Documents, Text Documents and may more. It also has features that help users to navigate and search for any resource that is stored in the Registry/Repository. Apart from the tree view and metadata search of resources, WSO2 Governance Registry has a feature where users can define custom report generation for any types of artifacts.

In this post, I'm focusing on adding a custom report that helps users to generate reports about services and policies that are stored in the Governance Registry.

Support for Report Generation


WSO2 Governance Registry has the capability of generating reports for metadata and activity search results. With this feature, a user has the ability to export the search results as a PDF, Excel or HTML report. A sample report that was generated using a metadata search result is given below. 

As you can see, this is a basic report that is generated with the search results and there is no easy way of adding more fields and changing the report layout. But the WSO2 Governance Registry has an extension point where you can add your own report template and add your own data set and generate reports using that report template.

In this post, I'm going to add a custom report that lists out all the Services and Policies that are stored in the Governance Registry. The report contains the following metadata about Services and Policies.

  • Name
  • Version
  • Description
  • Relationships(Dependencies and Associations)
  • Lifecycle state

The generated report is structured in the following manner.


Custom Reports


WSO2 Governance Registry uses the JasperReports library for generating reports. A user can define his own Jasper Report template(extension .jrxml) and a java class that injects data into that report and add it to the Governance Registry.

I have created a custom Jasper Report template and a GovernanceReportGenerator class that extends the org.wso2.carbon.registry.reporting.AbstractReportGenerator class to inject data into that reporting template.

Reporting template


The structure of the reporting template is as follows. I have used the iReport Designer  to design this reporting template. 


The report template is written in a Generic manner so that it will generate different tables for each of the data type. In this sample, I'm only sending data related to Services and Policies. The report template expects data sets which have sub data sets included in them.

GovernanceReportGenerator


The GovernanceReportGenerator class is responsible for fetching the data from the Governance Registry and creating the data collection structure which is expected by the report template. The GovernanceReportGenerator class uses a JRBeanCollectionDataSource as the datasource of the report. The class does two main operations. 
  1. Fetch the pre-defined governance artifacts from Governance Registry. This class fetch data related to Services and Policies using the Governance API of the WSO2 Governance Registry.
  2. Create the Bean structure for the JRBeanCollectionDataSource. The datasource is structured in the following manner. For all the JRBeanCollectionDataSources We pass a list of corresponding beans. 

The full source of GovernanceReportGenerator.java is as follows. All of these classes have been defined as inner classes of GovernanceReportGenerator.java. 

GovernanceReportGenerator.java


How to Add The Custom Report


We need to do few things in order to add this report generation to WSO2 Governance Registry. If you have not used WSO2 Governance Registry before, download the distribution using this page, unpack the distribution and start the server. More information on how to install and start the server can be found here.


  1. First we need to add the compiled .jar file to the server. We can do that from the Extensions menu in the Management Console.


    Once the extension is added, you can see it in the list view.


  2. Next we need to add the Report Template to the Registry Server. This can be added as a regular resource. Therefore I have added the governance_template.jrxml to the  /_system/governance/customReports/governance_template.jrxml location.


  3. The report template expects a logo resource. I have added the logo.png to the same location where I have added the Report Template. I have given system/wso2.anonymous.role read permissions for this resource too.


  4. Then we can add the report to the Registry Server. We can do that from the Management Console of the server. When adding the report, you need to specify the following.
    1. Report Name - A unique name for the report.
    2. Template - The resource location of the .jrxml file. In this scenario I have given /_system/governance/customReports/governance_template.jrxml as the report location.
    3. Report type - I have specified PDF. This can be changed later if required.
    4. Report class - Need to give the full qualified class name of the class we added in the initial step. For this sample I have given org.wso2.carbon.registry.samples.reporting.GovernanceReportGenerator as the full qualified class name. Once we define the class name we can click on the Load Attributes button. That will load the additional attributes that we have defined in our GovernanceReportGenerator.java.
    5. Description - The description that needs to be added to the generated report. This is a custom attribute that I have defined in my source. If we leave this as empty, then a default description is added.
    6. Report Title - The tile of the generated report. This is also a custom attribute and leaving it empty would set a default title.
    7. Report Logo - The  location of the logo that we have added previously. This is also a custom attribute and if left empty, the Report Generator will look for a logo under /_system/governance/repository/images/logo.png location.


  5. Once the above steps are completed we see the added report in the reports list.


  6. Now, by clicking on the Generate link, we can create a report of services and policies with above mentioned reporting template. You also have the option of scheduling the report generation.

Complete Source


The complete source of this sample can be found in my Github location using this link. You are welcome to improve this sample.


Friday, December 5, 2014

Loading data into WSO2 Governance Registry using an Excel data sheet

Storing data as files is one of the basic features of a Registry/Repository. Some advanced repositories have the capability of loading data into itself by reading various types of files including text, CSV and Excel. This post describes about how we can use an Excel sheet to load data into WSO2 Governance Registry.

The WSO2 Governance Registry has many extension points that can be used to alter its behavior.It also has a set of clients that can be used to access data in the repository without the use of the Management Console. A sample that uses the Remote Registry API can be found using this link.

In this post I'm going to describe how we can use the Governance API of WSO2 Governance Registry to create a set of governance artifacts by reading the content of an Excel file.


The Data Set


I have used the Reception to Year 2 books list which is listed in here, as my data set in this post. The data set contains information about a set of books with the following set of information.
  • Author(s)
  • Title
  • Series
  • Publisher
  • Published Year
  • Annotation

Governance Client


I have written a Remote Governance Client using the Governance API of WSO2 Governance Registry to read the data from the Excel files and add them to the Governance Registry. More information about the Governance API can be found here.

The Governance Client is written to map the data in each row of the Excel sheets into 2 separate Governance artifacts.

Book Publishers


RXT configuration is as follows.


Books


RXT configuration is as follows.

The Governance Client does the following.

  1. Read any Excel file in the pre-defined resource location.
  2. Read through each file and get the column headers.
  3. Use the properties files to map the column names to the Governance Artifact.
  4. Create a Governance Artifact for each row and add the row data to the attributes.
  5. Add the Governance Artifact.
After executing the Governance client, the book and publisher artifacts are added to the Registry. Sample output from the Management Console is something similar to the following.


The content of a book is like this. We also create an association to the book publisher from a book.


The complete Governance client code can be found at the end of this post. Let me highlight the important code segments. Also one of the important facts to highlight is that this Governance Client code is not a generic code and only covers this scenario. I only did little effort to make some parts of the code generic but with little more effort, this client can be made fully generic.

This code segment is used to read the Excel cell values and store them against the governance artifact field. There is a check to see whether this is the books Governance artifact because we need to add a relationship to the book publishers Governance artifact.


The following code is used to create the Governance artifact and add it to the Registry.


The Complete Code


The final code segment I used can be found in my git repo using this link. It contains the Java source as well as the RXT configurations too.  In order to make it easy for the readers, I have added the Governance client Java code below as well.

If you want to try out the complete sample, then these are the steps that should be followed.

  1. Download and extract a wso2greg-4.6.0 pack.
  2. Start the server.
  3. Login to the Management Console and add the RXT files to the Registry. Read through the docs to if you are not familiar on how to do it.
  4. Change the following constants in the RegistryResourceImporter.
    • CARBON_HOME - should point to where the wso2greg-4.6.0 pack is unzipped.
    • SERVICE_URL - Should be changed if you are not running with the default ports.
    • USERNAME - Should be changed if you change the default admin user name.
    • PASSWORD - Should be changed if you change the default admin password.
  5. Execute the client and the check from the Management Console.


RegistryResourceImporter.java

Saturday, June 8, 2013

Insert data into multiple tables using WSO2 Data Services Server - Introduction

The WSO2 Data Services Server (DSS) is an enterprise-grade, lean, 100% open source, cloud-enabled, multi-tenant data service hosting and management platform. From the next series of posts, I'm going to explain several ways that we can use the WSO2 DSS to insert data into multiple tables.

Before starting to go into detail, let us setup a simple environment to demonstrate our scenario. I'm going to use WSO2 Data services Server 3.0.1, which is the latest release at the time of this post. If you haven't downloaded it yet, you can download the product distribution through here. I will be using MySQL as the database during these posts.

In this introduction post, I'll be guiding you step by step through the process of creating a sample database to creating a sample data service that inserts data into two tables.

First, lets create the database.

Creating the sample database


1. Create a sample database.

I have named this database as 'order_sample'.


2. Create the tables. 

I am creating 2 tables in this database. "orders" and "order_items". Im using the following SQL statement to create the database tables.


Creating the sample data service


1. Copy the MySQL connector jar

Before starting the server, we need to copy the MySQL connector jar to $DSS_HOME/repository/components/lib directory.

2. Start the server and login

The DSS server can be started using the wso2server.sh/wso2server.bat file located in $DSS_HOME/bin folder. For more information on configuration of the Data Services Server, please refer to the documentation

3. Create the sample data service.

To create a data service we have to navigate to the following location, from the management console.
Home > Manage > Services > Add > Data Service > Create

Note: Please refer the documentation for more detailed description on how to create a data service

I have given the name "SampleInsert" as my data service name.


Next we need to give the data source information. I have given the connection details to the database we created earlier. 

Then Im going to construct my queries that needs to be executed. I have two queries, one to insert data in to the order_items table and another one to insert data to orders table.

Following is a snapshot of the "insert_order_items" query which I use to insert data to the order_item table. We need to pass 2 parameters for this query which are the order id and the item id.

The following image shows the "insert_orders" query which insert data to the order table. Even though this table has 3 columns we only pass values to "creation_time" and "created_by" columns. The "order_id" is an auto generated value from the database. Since we need this auto generated value for the  "insert_order_items" query, we enable "Return Generated Keys" in this query. As a result of this query execution, the auto generated id will be returned to the client.


Next I'm going to define the operations that needs to be exposed from the data service. I expose 2 operations, "addOrder" and "addOrderItem".


Now we have finished creating our data service. I'm going to test this using the "TryIt" functionality of WSO2 DSS.

Following is the request and the response of the "addOrder" operation for the DSS.


Then we can use the above generated id to invoke the "addOrderItem" operation.

We can check the database to see whether our tables got updated correctly.


Conclusion

This post explains the basic method of inserting data into multiple tables using WSO2 DSS. Note that this method is not executed in a single database transaction. From my next post, I'll explain on how to insert data into multiple tables in a transactional manner.

Wednesday, June 5, 2013

Return JSON response from WSO2 Data Services Server


WSO2 Data Services Server is  an enterprise-grade, lean, 100% open source, cloud-enabled, multi-tenant data service hosting and management platform. This post explains how we can configure the WSO2 DSS to return the response in JSON format.

During this post I will be using WSO2 Data Services Server 3.0.1, which is the latest release at the time of this post. If you haven't got it already, we can go to the Data Services Server homepage and use the download link there or you can use this link to download it directly.

I will not be explaining any of the basics about Data Services Server since all of the information can be found using the documentation.

I will be using the ResourcesSample that is shipped with the DSS distribution to demonstrate this functionality. This sample explains how data can be exposed as a REST resource using WSO2 Data Services Server. What I'm going to explain is how we can get the response of these services as a JSON String.

1. Change the axis2.xml and axis2_client.xml


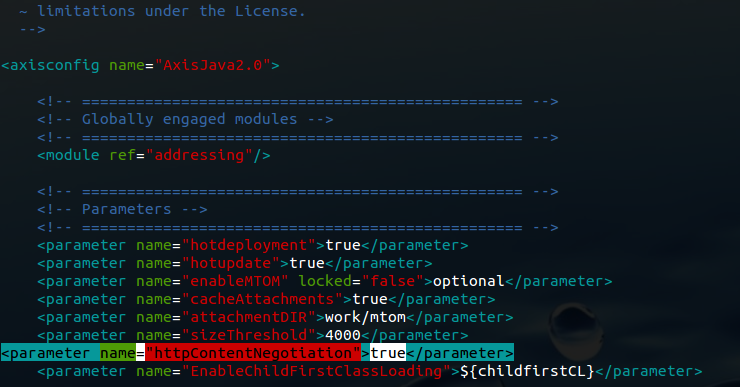
We need to add the following parameter to the axis2.xml and axis2_client.xml in the DSS server.  These files are found in CARBON_HOME/repository/conf/axis2 directory.

<parameter name="httpContentNegotiation">true</parameter>

First, lets change the axis2.xml. I have added this parameter to the parameters section in the axis2.xml. Note that this parameter is not there by default and we have to add that.


Next, we need to set the value of this parameter in axis2_client.xml to 'true'. Note that this parameter is there in the axis2_client.xml and we only need to change the value.


2. Deploy the samples


Use the instructions given in the samples guide to deploy the samples.

1. Stop the currently running Data Services Server instance if any. This is recommended in order to clean the current sample database and redeploy the services.
2. Remove the current sample database and existing sample data services.
# cd CARBON_HOME/samples
# ant clean
3. Deploy all samples.
# ant
4. Start the Data Services Server
# cd CARBON_HOME/bin
# wso2server.bat|sh

3. Run the sample 


Im going to use CURL to send a request to the DSS server. I will be using the same command that is described in the DSS documentation.

curl -X GET http://localhost:9763/services/samples/ResourcesSample.HTTPEndpoint/product/S10_1678

As as result, I get the following response from the DSS server.


Now let us try to get the same response in JSON format. In order to do that, I'm going change my request and add the following header to the request

"Accept:application/json"

Now my new request looks like the following.

curl -X GET -H "Accept:application/json" http://localhost:9763/services/samples/ResourcesSample.HTTPEndpoint/product/S10_1678 

Now you will observe that the same response is sent as a JSON string.


We can follow the same approach get a JSON response from the other invocations that is described in the DSS sample.

Tuesday, January 1, 2013

Getting started with WSO2 AppFactory


In my previous post, I mentioned about the WSO2 AppFactory application development platform. From this post I'm planning to give you some guidelines on how to run the pre-configured VM image of WSO2 AppFactory version 1.0.0 milestone 8 release.

The WSO2 AppFactory version 1.0.0 milestone 8 can be downloaded using this link. This zip file contains several files.
  • README.txt  
Readme file that describes how to run the VM image. This includes the necessary instructions on how to configure the IP settings in your local machine.
  • Samples
This is the samples directory. The milestone 8 release contains 5 samples. 
  • AFHelloWorld  
  • APIMIntegration  
  • DBSample  
  • FavouriteColourApp  
  • JenkinsTestReportingSample 
  • Wso2Appfactory
This folder contains the VMware image. This image is a pre-configured VMware image that includes all the necessary servers. It is configured in a way that it will start all the servers at VM image boot-up. 

Prerequisites

  1. VMware player should be installed in the host machine. 
  2. Host machine should be connected to the internet(for email verification purposes)
  3. At least 4GB ram is required(8GB ram is recommended)

Startup

  • Start the VMware Player.
  • Open the image. (open the Wso2Appfactory.vmx file)
  • Start the virtual machine.
  • If prompted, selected the option "I moved it".
  • After startup, login to the server. (username - appfactory, password - appfactory)
  • Get the IP address of the VM server. (ifconfig in linux)
  • Add the following entries to the host file in your local machine( /etc/hosts in linux). Use the above IP address for these entries(replace 10.100.3.36 with the correct IP address).
10.100.3.36 appfactorypreview.wso2.com
10.100.3.36 appserver.prod.appfactorypreview.wso2.com
10.100.3.36 appserver.dev.appfactorypreview.wso2.com
10.100.3.36 appserver.test.appfactorypreview.wso2.com
10.100.3.36 controller.appfactorypreview.wso2.com
10.100.3.36 jenkins.appfactorypreview.wso2.com
10.100.3.36 redmine.appfactorypreview.wso2.com
10.100.3.36 apimanager.appfactorypreview.wso2.com

  • Finally to access different servers, use the following URLs
Access Appfactory https://appfactorypreview.wso2.com/appmgt/
Access Dev cloud Application server https://appserver.dev.appfactorypreview.wso2.com/
Access Test cloud Application server https://appserver.test.appfactorypreview.wso2.com/
Access Production cloud Application server https://appserver.prod.appfactorypreview.wso2.com/ 

Monday, December 31, 2012

WSO2 AppFactory

WSO2 AppFactory is a platform that has the capability of managing the application development lifecycle of an organization. It is a platform that unifies the different aspects of application development such as,
  1. Source control
  2. Build management
  3. Governance(application lifecycle management)
  4. Issue tracking
  5. API integration (integration with products like WSO2 API Manager

Couple of weeks back, we released WSO2 AppFactory 1.0.0 milestone 8. This version of WSO2 AppFactory has a set of key features which it inherited from its previous releases and some new features as well.
  • Lifecycle management of an application
  • Automated build and deployment
  • Support multiple application versions
  • APIs to integrate with SDLC Tool chain
  • SVN/GIT repository provisioning
  • Out of the box integration with Jenkins, Redmine
  • Integrated with WSO2 API Manager
  • Role based views
  • Dashboards to monitor application development
  • CIO/CEO dashboards 
  • Dependency Management - API sandboxing
  • Create applications with Git (new)
  • Tagging builds with a name (new)
  • Improved deployment model (new)
  • Moving the servers to standard ports 80/443 (new)
  • Ability to work with a Jenkins farm (new)
  • Log download feature (new)
  • Approval UI and human tasks (new)
  • Human task enabled user creation process (new)
  • Search Application Gadget (new)
  • Event Stream View (new)
  • Resource dependency Management UI (new)
We have created a pre-configured VM image with the WSO2 Appfactory 1.0.0 milestone 8 and it can be downloaded using [1]. This VM image is configured in such a way that, it will start all the necessary servers at image start-up.