Showing posts with label WSO2. Show all posts

Sunday, July 24, 2016

How to send an email from WSO2 Business Process Server using BPMN workflows

This post applies to WSO2 Business Process Server 3.5.1

From the past couple of posts, I have explained how we can create a simple BPMN workflow and use the WSO2 Business Process Server to deploy and test that. From this post, Im going to explain how we can send an Email from Business Process Server as a part of a workflow activity.

As an example, we are going to extend the same workflow that was created in the earlier posts. We will add a email sending task and also explore how we can get information that was sent as the inputs for the workflow.


1. Lets change our workflow inputs and add email address as an input parameter.


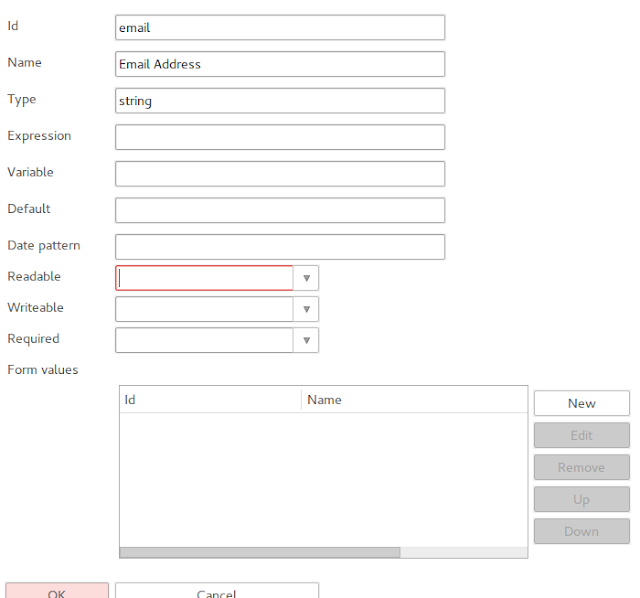
Now our workflow is having 4 input parameters.


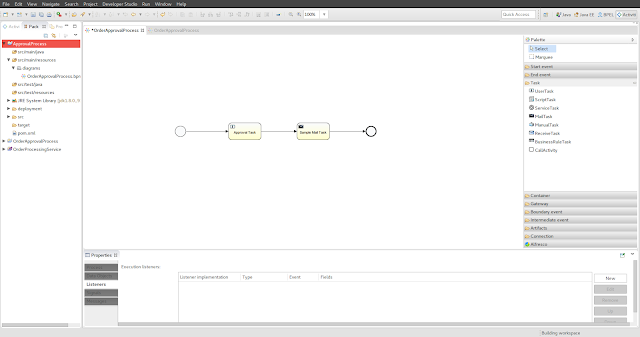
2. To send an email, we have to add a "MailTask" for the workflow. Lets add that after the Human Task of our workflow. The final workflow should look like the following.


3. Lets configure the mail task to send emails to the email address given in the input parameters to the workflow. We can use the inbuilt variables to do this. Any input parameter(or a result from another task) can be accessed through the rest of the flow by giving the ID parameter in a special notation such as the following.

${variable_name}

For Ex: To access the email variable, the following notation should be used.

${email}
Note :The "email" is the Id we have given for that field at the start event. 
Also you can access these variables in conjunction with other constant string values. Therefore we can create more informative email subjects and content.

Lets configure the "MailTask" parameters. I have configured the parameters in the following way.

To :
${email}
From :
noreply@order.sample.com
Subject :
Thank you for placing an order from us
 Non html :
Dear ${userId},

Thank you for placing your order with us.
We have  ${action} your order items of ${orderItem}.

Thanks,
Order.Sample

Note:
The above ${action} is not an input parameter for the workflow but it is the response from the Human Task of the workflow.

The final configuration of the "Mail Task" should look like the following.


4. The workflow is complete. Lets create a deployment artifact and deploy that in the WSO2 Business Process Server.

Note:
If you are using the same WSO2 Business Process Server to try out this sample, please undeploy the earlier added process and add the new one. 


5. Configure the Business Process Server with the mail server we want to use. To configure the mail server, we have to edit the repository/conf/activiti.xml file that is located in the Business Process Server distribution(<CARBON_HOME/repository/conf/activiti.xml>).

We have to add the following properties to the activiti.xml to configure the mail server.

<property name="mailServerHost" value="smtp.gmail.com"/>
<property name="mailServerPort" value="456"/>
<property name="mailServerDefaultFrom" value="mailtask@gmail.com"/>
<property name="mailServerUseSSL" value="true"/>
<property name="mailServerUsername" value="mailtask@gmail.com"/>
<property name="mailServerPassword" value="mailtask123"/>

Once the properties have been configured, the activiti.xml should look like the following.


Then you have to copy the following jar files into the <BPS_HOME>/repository/components/lib directory and restart the server.
For more information about configuring email server for Business Process Server, please refer to the documentation.

6. Lets invoke the BPMN process and tryout the email sending scenario. We can use the BPMN Explorer as we did in the earlier posts.

Once we tried to start the workflow from the BPMN Explorer, you should now see the additional parameter - email address as an input parameter.


Please note that you have to complete the Human Task in-order to get the email as we have the Human Task before the Mail Task


You should get an email as shown below to the given email address as the input of the workflow.


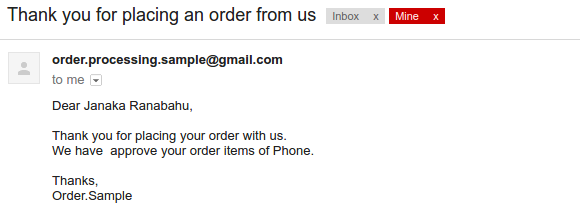
As you can see, the variables that we defined in the email template have been replaced by the input values we have given.

Conclusion 

This post explained on how to send an email from WSO2 Business Process Server as part of a workflow. Also we have explored on how to use the variables to dynamically generate the email using a template we have defined.

Thursday, July 21, 2016

How to deploy and test a BPMN workflow in WSO2 Business Process Server

This post applies to WSO2 Business Process Server 3.5.1

In my previous post, I have explained on how to create a simple workflow with a Human Task. From this post, I will explain how we can deploy a BPMN process in WSO2 Business Process Server and test that using the default bpmn-explorer that comes with the distribution.

If you have not used the Business Process Server, please visit the product pages of Business Process Server to get a general idea about the product. Also please refer to the documentation of Business Process Server  for more information.

If you have not worked with BPMN workflows, please refer to my previous post to get an idea on how to create a simple workflow. This post assumes that you have followed the above mentioned post and the deployment artifacts have been completed.

BPMN Explorer

The WSO2 Business Process Server comes with a bpmn explorer application for users to easily look at the workflows that are displayed in Business Process Server. Also the default application would list down any of the Human Tasks that are allocated to the current logged in user. The application would also display stats on the workflows that are already been deployed and the active/completed tasks.

You can access the BPMN explorer application using the URL give below.
https://localhost:9443/bpmn-explorer/
Note:
Please note that the above URL is for a Business Process Server that is running locally with no port offset.


As you can see from the above screenshot, the default application gives a comprehensive set of actions/operations for a user.

Lets deploy the sample BPMN workflow we created earlier and look at the information that is given from the above application.

Deploy a BPMN Process

We can use the Management Console of the Business Process Server to deploy the artifact we created earlier.

Note:
For those who are not familiar with the WSO2 Business Process Server, you can access the Management Console using the following URL. Also you can use the default admin creadentials(user name: "admin", password : "admin") to login to the Management Console.
https://localhost:9443/carbon

Once you have logged in to the Management Console, you can upload the BPMN artifact by navigating to the  Process --> Add --> BPMN page.


Once the upload process completes, you should see a log similar to the following.


Also the BPMN process should also be listed under the "List" page.


The BPMN Explorer would also display the deployed workflows. The dashboard gets updated with the workflows that has been deployed and when navigated to the "Processes" tab, you can also see the deployed BPMN workflows.


Testing a BPMN Workflow


As mentioned above in this post, we can use the default BPMN Explorer application to test a workflow that we have created and uploaded to the Business Process Server.

We need to login to the BPMN Explorer application and navigate to the "Processes" tab and click on the "Start" button against the desired workflow.

Then there would be a page that displays all the input parameters we have defined in our workflow. Once we fill in all those values, we can start the process by clicking on the "Start" button.


Since we have defined a Human Task in this sample(which gets assigned to the default admin user), we can navigate to the "My Tasks" tab to see what are the pending Human Tasks that needs the user interaction. 


Once we click on the pending task, we can see more information about that.


If you take a closer look at the above screenshot, you can see that the input values we have given when configuring the Human Task is displayed here. Also we can see the actions that we have defined as a dropdown. The user can select any desired action and complete the Human Task by clicking on the "Complete Task" button. 

The BPMN Explorers dashboards would also get updated to reflect the total number of workflow instances that have been created along with the status of each of them.


Conclusion


We can use the default BPMN Explorer application to test any of the BPMN workflows that are deployed in the WSO2 Business Process Server.

How to create a BPMN Workflow with Human Tasks

This post applies to WSO2 Business Process Server 3.5.1

This post contains the steps that are required to create a simple BPMN workflow that contains a Human Task. We will use the WSO2 Developer Studio to create the BPMN workflow and WSO2 Business Process Server to deploy and host the workflow.

If you have not used the above mentioned products, please visit the product pages of Business Process Server and the Developer Studio get a general idea about the products. Also please refer to the documentation of Business Process Server and Developer Studio for more information.


Note:
The default distribution of the WSO2 Developer Studio does not pack all the required plugins to create the BPMN workflows. Since the BPMN support for WSO2 Business Process Server was added by integrating Activiti engine 5.19.0, with the BPS Server. The Developer Studio should install the Activiti Eclipse Designer plugin in-order to create the workflows.


  1.  Installing the Activiti Eclipse Designer plugin in Developer Studio

    Navigate to
    Help --> Install New Software

    Add the Activiti repository by clicking on
    "Add" button

    Give the repository URL and the Name and install the
    "Activiti BPMN Designer" related components

    Name : Activiti BPMN Designer
    URL : http://activiti.org/designer/update/

  2. Create a new Activiti Project


  3. Once the Activiti Project has been created, then we need to create a Activiti Diagram. Use the previously created project as the project for the diagram we are going to create.


  4. Now we can start creating the workflow. We are only going to create a simple workflow that contains a Human Task. We are going to have 3 input fields to the workflow

    User Name
    Order Items
    Description

    The Human Task would display all 3 values for the user to take action. Then the process would exit with the user action. We do not do anything else from this workflow as the main intention is to give a detail explanation of how the human tasks can be configured.

    A Start task can be added easily by using the tools platter that comes when working on the Activiti diagram.


    Also we can define the inputs for our workflow by navigating to the "form" section under properties of the start task.

    A sample input definition is given below.


    The final output definition looks as below.

  5. Now lets add a "User Task", This can be found under the tasks section of the tools platter. The User Task signifies the human task that needs to happen.


    In the user task there are multiple configurations that needs to be done.

    - Configure the users/roles that the task needs to be assigned.
    The "main config" section under the properties allows us to define the users and roles that these tasks should be assigned to.In this example, we assign all the tasks for the "admin" user.

    In the main config section, the Assignee field defines the user name of the default assignee. Since we are assigning all these for the admin user in this example we set the value of that field to admin.
    The Candidate us...a separated) and Candidate gr...a separated) fields defines the list of users and roles that the tasks needs to be assigned respectively. A comma separated list of user names and roles names can be given to each filed respectively.

    - Configure the inputs and outputs to the User Task
    We have to define the inputs and outputs of the user task as we did for the start event. These inputs can be taken from the values that was received at the start of the workflow(or from any responses of the intermediate tasks if there were any).


    We can use the Variable field to define which variable we should take these values from.

    Similarly we can define the output values as well. We have defined the output as a enum type and defined 3 actions that the user can take.

    Approve
    Disapprove
    Discard


    The final input/output definition is as follows.

  6. We end the workflow by adding a End task. Also we have to give a meaningful name for the workflow we are creating. This can be done by clicking on the canvas area and changing the Name and Id fields under process section of properties.

  7. Now our simple workflow is complete and we need to create a deployable artifact out of that. This can be done by right clicking on the project(note that you have to be in the package view) and selecting the "Create deployment artifacts" option at the end. Once you complete this, a deployment artifact(OrderApprovalProcess.bar) would be created under the deployment directory of the project.

I will explain how to deploy this artifact in the Business Process Server and test it using the defaul bpmn-dashboard that comes with the product from my next post.

Friday, July 8, 2016

Force shutdown/Kill WSO2 Servers running in a Linux environment

In Linux there are multiple ways to force shutdown/kill all the process of a certain type. If we want to force shutdown all the WSO2 Servers that are running on a particular node, we can easily execute the following command.
killall java
The problem with the above command is that it will force shutdown all the java process running on that node which are not WSO2 specific.

The following command can be used to force shutdown or kill all the WSO2 servers that are running on a particular node and leave the other Java process intact.

ps -ef | egrep 'wso2' | mawk '{print($2)}' | xargs kill -9

Sunday, May 1, 2016

How to use Ready! API to test APIs published in WSO2 API Manager

In this post I'm going to explain on how we can use the Ready! API(SmartBear Software) to test API's that are published in the WSO2 API Manager.

WSO2 API Manager


WSO2 API Manager is a 100% opensource solution for designing and publishing APIs. It also has the capability to create and manage a developer community. The core of the WSO2 API Manager is created using the WSO2 Enterprise Service Bus, Identity Server and Governance Registry components.

Ready! API


Ready! API is a product that is developed by SmartBear software which includes a platform of tools such as SoapUI NG Pro, LoadUI NG Pro, Secure Pro and ServiceV Pro that can be used to effectivly test API functinality. A more detailed description about these products can be found using their product page.


This post focus more on the Ready API Plugin usage and not WSO2 API Manager product functionalities. If you are new to WSO2 API Manager, I suggest you to go through our product page and documentation to get an idea about what WSO2 API Manager is and how to use it.


Ready! API has an extension point where people can create a plugin and alter the behavior of the product. WSO2 Team has created a plugin(named WSO2 API Manager Plugin)  for Ready API which helps the users to Integrate and Test their APIs that are visible in the WSO2 API Store. This blog post focuses on describing the features and advantages of the plugin.


WSO2 API Manager Plugin


Installation


The WSO2 API Manager Plugin is published in the Ready API Plugin repository. Hence installing the plugin can be done using following a simple set of steps. 

  1. Navigate to the Plugin Manager.
  2. Click on  "Browse Plugin Repository".
  3. Select the "WSO2 API Manager Integration" Plugin and click Install.
The following screenshot shows the above mentioned steps.


Usage

Once the plugin is installed, there are multiple ways to get the advantage of the plugin.

1. Create a project by importing a new API.
2. Add a new API to an already existing project.


When using both of the above mentioned options, you would see a prompt to enter the API Store connectivity details. What we need to do is to fill in the details and press the "OK" button. Note that the tenant domain field is not required if you are connecting to the super tenant store as the plugin will connect to the super tenant store if the field is not specified. 


After the above step, the plugin will connect to the API Store(give by the user) and list out all the APIs in its API list prompt.


The user only has to select the API(can select multiple APIs) and whether to create a test suit and a load test for the API. The plugin will connect to the API Manager instance using the REST APIs of the API Publisher and Store and will create a project by reading the swagger definition of the API(or APIs). The final outcome would be something similar to the following.


As you would notice, the plugin reads the Swagger definition and create a project with the sample requests. The plugin also creates an OAuth2 authorization profile with the name "wso2-api-manager-default" so that the end users would only need to give the OAuth2 token that they generated from the API Manager Store.

Once the API import is complete, the usage of the plugin is really simple. The user only needs to give the OAuth2 token to the "Access Token" field and fill in the necessary request parameters before invoking the sample request.

The response would look like what is stated in the image below.


As shown in the above steps, you could import any number of APIs from the API Store and test them using the Ready! API. Similar to the project created in SoapUI NG Pro, there would be projects created on LoadUI if the user has selected that option when importing the APIs.

Summary


The WSO2 API Manager plugin in the SmartBear plugin repository was developed to have a seamless experience when testing the APIs published in the WSO2 API Manager using Ready! API Platform. In summary the current plugin supports the listing of APIs in the given Store, creating sample requests for the selected APIs by reading their Swagger definitions and create test suits and load tests if that option was selected and many more features.

For more information about the plugin usage, please refer to this article and the Github project for the plugin.

What Ready! API integration brings to the WSO2 API Manager Platform

WSO2 API Manager is a complete free and opensource solution that has a rich set of features for API Creation, Publication and the complete API Lifecycle management with features to secure the API invocation. All these features come from the WSO2 platform and from the core features used in the products such as WSO2 Enterprise Service Bus, WSO2 Identity Server and WSO2 Governance Registry. In addition to that, the API Management platform utilizes the power of the WSO2 Data Analytics server for the API statistics analytics.

The above features of API Manager focuses more towards the development and run time aspects of the complete API development lifecycle. Apart from the above main states of a API development lifecycle, the other most important state is the Testing state. 

From this post, I will talk about the WSO2 API Manager and its integration with the Ready! API(by SmartBear) and what capabilities it brings to the WSO2 API Manager platform.

I'm assuming that everyone who reads this post would have some level of understanding about WSO2 API Manager and how it operates. I'm not going to explain the basics of WSO2 API Manager from this post. For more information about the API Manager product, please visit the product home page.

Ready! API

Ready! API is a platform of API testing tools by SmartBear which combines the power of SoapUI NG Pro, LoadUI NG Pro, Secure, ServiceV, and API Monitoring in AlertSite into a single bundle to give its users the power of functional testing, performance testing to post-deployment monitoring. For more information about Ready! API, please visit the Ready! API product overview page.

Ready! API Integration

Lets look at what Ready! API brings to the WSO2 Platform.

API testing is one of the key aspects of the API Development lifecycle. Any API Management solution would have integrated tools for API testing but most would lack the ability to conduct a complete API testing that a commercial tool would give. Most of the embedded tools would only have the capability of doing basic testing to get an idea about the request/response as well as to try out the different resources exposed from the API.

With the above points in play, it is important that the commercial API testing tools in the market could integrate with your solution to give the users the ability to carryout testing at will. We have done the same by making our API Management solution integrate with Ready! API, to give the ultimate API testing experience.


WSO2 Ready API Plugin

We have developed a plugin for the Ready! API to integrate with WSO2 API Manager and discover the APIs published in the Store. The plugin helps its users to select the APIs that needs to be imported using its inbuilt API Store browser and does all the work from creating the project, creating the sample requests to creating the load tests in LoadUI.  The plugin has been deployed to the SmartBear plugin repository so that Ready! API users would have the best user experience when using the WSO2 Ready API Plugin. For more information, please visit the SmartBear plugin repository and the github project of the WSO2 Ready API Plugin.

Conclusion

The development of the WSO2 Ready API Plugin has helped the WSO2 API Management platform to move to the next level by being able to integrate with a commercial API testing platform. The advantages of the Ready! API platform, including its core components of SoapUI NG Pro, LoadUI NG Pro, Secure, ServiceV, and API Monitoring in AlertSite have strengthened the API development lifecycle of the WSO2 API Management Platform. 

Sunday, December 7, 2014

Generate custom reports using WSO2 Governance Registry

WSO2 Governance Registry has many features that helps users to store and manage different types of data including Service metadata, WSDLs, Word Documents, PDF Documents, Text Documents and may more. It also has features that help users to navigate and search for any resource that is stored in the Registry/Repository. Apart from the tree view and metadata search of resources, WSO2 Governance Registry has a feature where users can define custom report generation for any types of artifacts.

In this post, I'm focusing on adding a custom report that helps users to generate reports about services and policies that are stored in the Governance Registry.

Support for Report Generation


WSO2 Governance Registry has the capability of generating reports for metadata and activity search results. With this feature, a user has the ability to export the search results as a PDF, Excel or HTML report. A sample report that was generated using a metadata search result is given below. 

As you can see, this is a basic report that is generated with the search results and there is no easy way of adding more fields and changing the report layout. But the WSO2 Governance Registry has an extension point where you can add your own report template and add your own data set and generate reports using that report template.

In this post, I'm going to add a custom report that lists out all the Services and Policies that are stored in the Governance Registry. The report contains the following metadata about Services and Policies.

  • Name
  • Version
  • Description
  • Relationships(Dependencies and Associations)
  • Lifecycle state

The generated report is structured in the following manner.


Custom Reports


WSO2 Governance Registry uses the JasperReports library for generating reports. A user can define his own Jasper Report template(extension .jrxml) and a java class that injects data into that report and add it to the Governance Registry.

I have created a custom Jasper Report template and a GovernanceReportGenerator class that extends the org.wso2.carbon.registry.reporting.AbstractReportGenerator class to inject data into that reporting template.

Reporting template


The structure of the reporting template is as follows. I have used the iReport Designer  to design this reporting template. 


The report template is written in a Generic manner so that it will generate different tables for each of the data type. In this sample, I'm only sending data related to Services and Policies. The report template expects data sets which have sub data sets included in them.

GovernanceReportGenerator


The GovernanceReportGenerator class is responsible for fetching the data from the Governance Registry and creating the data collection structure which is expected by the report template. The GovernanceReportGenerator class uses a JRBeanCollectionDataSource as the datasource of the report. The class does two main operations. 
  1. Fetch the pre-defined governance artifacts from Governance Registry. This class fetch data related to Services and Policies using the Governance API of the WSO2 Governance Registry.
  2. Create the Bean structure for the JRBeanCollectionDataSource. The datasource is structured in the following manner. For all the JRBeanCollectionDataSources We pass a list of corresponding beans. 

The full source of GovernanceReportGenerator.java is as follows. All of these classes have been defined as inner classes of GovernanceReportGenerator.java. 

GovernanceReportGenerator.java


How to Add The Custom Report


We need to do few things in order to add this report generation to WSO2 Governance Registry. If you have not used WSO2 Governance Registry before, download the distribution using this page, unpack the distribution and start the server. More information on how to install and start the server can be found here.


  1. First we need to add the compiled .jar file to the server. We can do that from the Extensions menu in the Management Console.


    Once the extension is added, you can see it in the list view.


  2. Next we need to add the Report Template to the Registry Server. This can be added as a regular resource. Therefore I have added the governance_template.jrxml to the  /_system/governance/customReports/governance_template.jrxml location.


  3. The report template expects a logo resource. I have added the logo.png to the same location where I have added the Report Template. I have given system/wso2.anonymous.role read permissions for this resource too.


  4. Then we can add the report to the Registry Server. We can do that from the Management Console of the server. When adding the report, you need to specify the following.
    1. Report Name - A unique name for the report.
    2. Template - The resource location of the .jrxml file. In this scenario I have given /_system/governance/customReports/governance_template.jrxml as the report location.
    3. Report type - I have specified PDF. This can be changed later if required.
    4. Report class - Need to give the full qualified class name of the class we added in the initial step. For this sample I have given org.wso2.carbon.registry.samples.reporting.GovernanceReportGenerator as the full qualified class name. Once we define the class name we can click on the Load Attributes button. That will load the additional attributes that we have defined in our GovernanceReportGenerator.java.
    5. Description - The description that needs to be added to the generated report. This is a custom attribute that I have defined in my source. If we leave this as empty, then a default description is added.
    6. Report Title - The tile of the generated report. This is also a custom attribute and leaving it empty would set a default title.
    7. Report Logo - The  location of the logo that we have added previously. This is also a custom attribute and if left empty, the Report Generator will look for a logo under /_system/governance/repository/images/logo.png location.


  5. Once the above steps are completed we see the added report in the reports list.


  6. Now, by clicking on the Generate link, we can create a report of services and policies with above mentioned reporting template. You also have the option of scheduling the report generation.

Complete Source


The complete source of this sample can be found in my Github location using this link. You are welcome to improve this sample.


Friday, December 5, 2014

Loading data into WSO2 Governance Registry using an Excel data sheet

Storing data as files is one of the basic features of a Registry/Repository. Some advanced repositories have the capability of loading data into itself by reading various types of files including text, CSV and Excel. This post describes about how we can use an Excel sheet to load data into WSO2 Governance Registry.

The WSO2 Governance Registry has many extension points that can be used to alter its behavior.It also has a set of clients that can be used to access data in the repository without the use of the Management Console. A sample that uses the Remote Registry API can be found using this link.

In this post I'm going to describe how we can use the Governance API of WSO2 Governance Registry to create a set of governance artifacts by reading the content of an Excel file.


The Data Set


I have used the Reception to Year 2 books list which is listed in here, as my data set in this post. The data set contains information about a set of books with the following set of information.
  • Author(s)
  • Title
  • Series
  • Publisher
  • Published Year
  • Annotation

Governance Client


I have written a Remote Governance Client using the Governance API of WSO2 Governance Registry to read the data from the Excel files and add them to the Governance Registry. More information about the Governance API can be found here.

The Governance Client is written to map the data in each row of the Excel sheets into 2 separate Governance artifacts.

Book Publishers


RXT configuration is as follows.


Books


RXT configuration is as follows.

The Governance Client does the following.

  1. Read any Excel file in the pre-defined resource location.
  2. Read through each file and get the column headers.
  3. Use the properties files to map the column names to the Governance Artifact.
  4. Create a Governance Artifact for each row and add the row data to the attributes.
  5. Add the Governance Artifact.
After executing the Governance client, the book and publisher artifacts are added to the Registry. Sample output from the Management Console is something similar to the following.


The content of a book is like this. We also create an association to the book publisher from a book.


The complete Governance client code can be found at the end of this post. Let me highlight the important code segments. Also one of the important facts to highlight is that this Governance Client code is not a generic code and only covers this scenario. I only did little effort to make some parts of the code generic but with little more effort, this client can be made fully generic.

This code segment is used to read the Excel cell values and store them against the governance artifact field. There is a check to see whether this is the books Governance artifact because we need to add a relationship to the book publishers Governance artifact.


The following code is used to create the Governance artifact and add it to the Registry.


The Complete Code


The final code segment I used can be found in my git repo using this link. It contains the Java source as well as the RXT configurations too.  In order to make it easy for the readers, I have added the Governance client Java code below as well.

If you want to try out the complete sample, then these are the steps that should be followed.

  1. Download and extract a wso2greg-4.6.0 pack.
  2. Start the server.
  3. Login to the Management Console and add the RXT files to the Registry. Read through the docs to if you are not familiar on how to do it.
  4. Change the following constants in the RegistryResourceImporter.
    • CARBON_HOME - should point to where the wso2greg-4.6.0 pack is unzipped.
    • SERVICE_URL - Should be changed if you are not running with the default ports.
    • USERNAME - Should be changed if you change the default admin user name.
    • PASSWORD - Should be changed if you change the default admin password.
  5. Execute the client and the check from the Management Console.


RegistryResourceImporter.java