Sunday, July 24, 2016

How to send an email from WSO2 Business Process Server using BPMN workflows

This post applies to WSO2 Business Process Server 3.5.1

From the past couple of posts, I have explained how we can create a simple BPMN workflow and use the WSO2 Business Process Server to deploy and test that. From this post, Im going to explain how we can send an Email from Business Process Server as a part of a workflow activity.

As an example, we are going to extend the same workflow that was created in the earlier posts. We will add a email sending task and also explore how we can get information that was sent as the inputs for the workflow.


1. Lets change our workflow inputs and add email address as an input parameter.
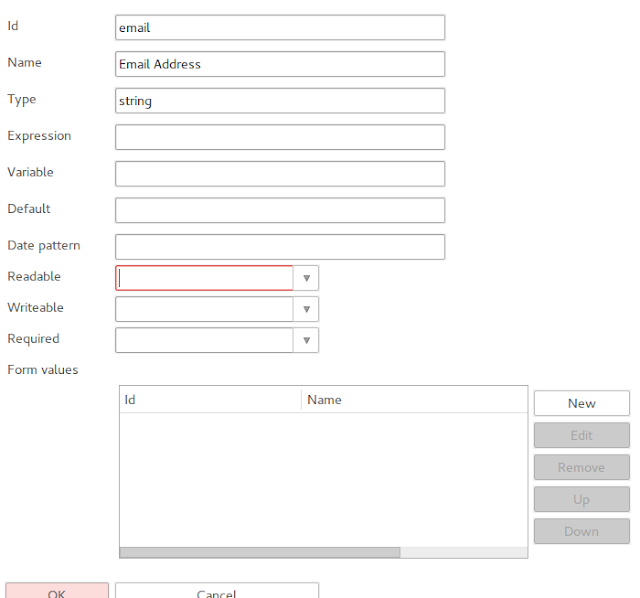


Now our workflow is having 4 input parameters.


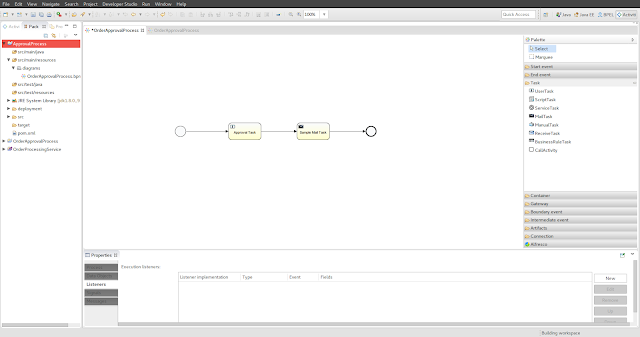
2. To send an email, we have to add a "MailTask" for the workflow. Lets add that after the Human Task of our workflow. The final workflow should look like the following.


3. Lets configure the mail task to send emails to the email address given in the input parameters to the workflow. We can use the inbuilt variables to do this. Any input parameter(or a result from another task) can be accessed through the rest of the flow by giving the ID parameter in a special notation such as the following.

${variable_name}

For Ex: To access the email variable, the following notation should be used.

${email}
Note :The "email" is the Id we have given for that field at the start event. 
Also you can access these variables in conjunction with other constant string values. Therefore we can create more informative email subjects and content.

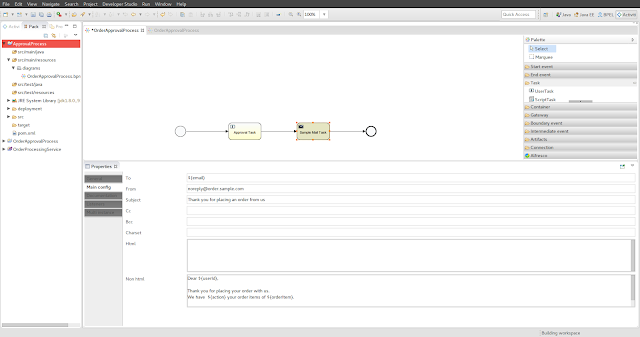
Lets configure the "MailTask" parameters. I have configured the parameters in the following way.

To :
${email}
From :
noreply@order.sample.com
Subject :
Thank you for placing an order from us
 Non html :
Dear ${userId},

Thank you for placing your order with us.
We have  ${action} your order items of ${orderItem}.

Thanks,
Order.Sample

Note:
The above ${action} is not an input parameter for the workflow but it is the response from the Human Task of the workflow.

The final configuration of the "Mail Task" should look like the following.


4. The workflow is complete. Lets create a deployment artifact and deploy that in the WSO2 Business Process Server.

Note:
If you are using the same WSO2 Business Process Server to try out this sample, please undeploy the earlier added process and add the new one. 


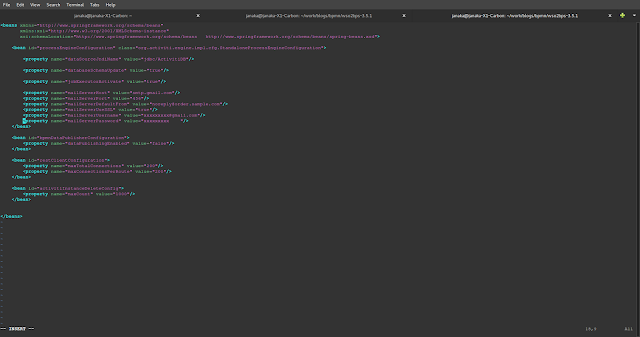
5. Configure the Business Process Server with the mail server we want to use. To configure the mail server, we have to edit the repository/conf/activiti.xml file that is located in the Business Process Server distribution(<CARBON_HOME/repository/conf/activiti.xml>).

We have to add the following properties to the activiti.xml to configure the mail server.

<property name="mailServerHost" value="smtp.gmail.com"/>
<property name="mailServerPort" value="456"/>
<property name="mailServerDefaultFrom" value="mailtask@gmail.com"/>
<property name="mailServerUseSSL" value="true"/>
<property name="mailServerUsername" value="mailtask@gmail.com"/>
<property name="mailServerPassword" value="mailtask123"/>

Once the properties have been configured, the activiti.xml should look like the following.


Then you have to copy the following jar files into the <BPS_HOME>/repository/components/lib directory and restart the server.
For more information about configuring email server for Business Process Server, please refer to the documentation.

6. Lets invoke the BPMN process and tryout the email sending scenario. We can use the BPMN Explorer as we did in the earlier posts.

Once we tried to start the workflow from the BPMN Explorer, you should now see the additional parameter - email address as an input parameter.
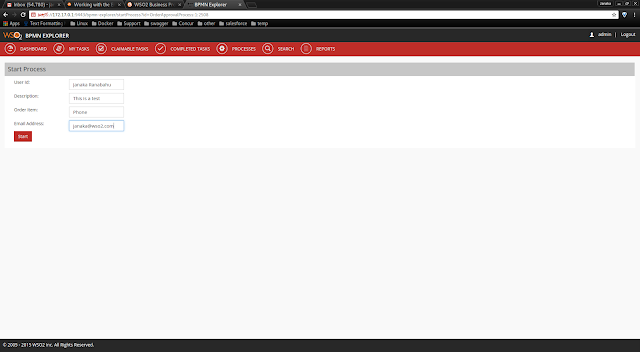
 

Please note that you have to complete the Human Task in-order to get the email as we have the Human Task before the Mail Task


You should get an email as shown below to the given email address as the input of the workflow.
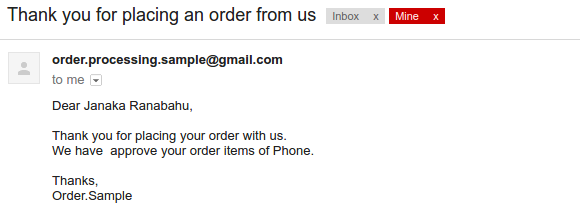
 

As you can see, the variables that we defined in the email template have been replaced by the input values we have given.

Conclusion 

This post explained on how to send an email from WSO2 Business Process Server as part of a workflow. Also we have explored on how to use the variables to dynamically generate the email using a template we have defined.

Thursday, July 21, 2016

How to deploy and test a BPMN workflow in WSO2 Business Process Server

This post applies to WSO2 Business Process Server 3.5.1

In my previous post, I have explained on how to create a simple workflow with a Human Task. From this post, I will explain how we can deploy a BPMN process in WSO2 Business Process Server and test that using the default bpmn-explorer that comes with the distribution.

If you have not used the Business Process Server, please visit the product pages of Business Process Server to get a general idea about the product. Also please refer to the documentation of Business Process Server  for more information.

If you have not worked with BPMN workflows, please refer to my previous post to get an idea on how to create a simple workflow. This post assumes that you have followed the above mentioned post and the deployment artifacts have been completed.

BPMN Explorer

The WSO2 Business Process Server comes with a bpmn explorer application for users to easily look at the workflows that are displayed in Business Process Server. Also the default application would list down any of the Human Tasks that are allocated to the current logged in user. The application would also display stats on the workflows that are already been deployed and the active/completed tasks.

You can access the BPMN explorer application using the URL give below.
https://localhost:9443/bpmn-explorer/
Note:
Please note that the above URL is for a Business Process Server that is running locally with no port offset.


As you can see from the above screenshot, the default application gives a comprehensive set of actions/operations for a user.

Lets deploy the sample BPMN workflow we created earlier and look at the information that is given from the above application.

Deploy a BPMN Process

We can use the Management Console of the Business Process Server to deploy the artifact we created earlier.

Note:
For those who are not familiar with the WSO2 Business Process Server, you can access the Management Console using the following URL. Also you can use the default admin creadentials(user name: "admin", password : "admin") to login to the Management Console.
https://localhost:9443/carbon

Once you have logged in to the Management Console, you can upload the BPMN artifact by navigating to the  Process --> Add --> BPMN page.


Once the upload process completes, you should see a log similar to the following.


Also the BPMN process should also be listed under the "List" page.


The BPMN Explorer would also display the deployed workflows. The dashboard gets updated with the workflows that has been deployed and when navigated to the "Processes" tab, you can also see the deployed BPMN workflows.


Testing a BPMN Workflow


As mentioned above in this post, we can use the default BPMN Explorer application to test a workflow that we have created and uploaded to the Business Process Server.

We need to login to the BPMN Explorer application and navigate to the "Processes" tab and click on the "Start" button against the desired workflow.

Then there would be a page that displays all the input parameters we have defined in our workflow. Once we fill in all those values, we can start the process by clicking on the "Start" button.


Since we have defined a Human Task in this sample(which gets assigned to the default admin user), we can navigate to the "My Tasks" tab to see what are the pending Human Tasks that needs the user interaction. 


Once we click on the pending task, we can see more information about that.


If you take a closer look at the above screenshot, you can see that the input values we have given when configuring the Human Task is displayed here. Also we can see the actions that we have defined as a dropdown. The user can select any desired action and complete the Human Task by clicking on the "Complete Task" button. 

The BPMN Explorers dashboards would also get updated to reflect the total number of workflow instances that have been created along with the status of each of them.


Conclusion


We can use the default BPMN Explorer application to test any of the BPMN workflows that are deployed in the WSO2 Business Process Server.

How to create a BPMN Workflow with Human Tasks

This post applies to WSO2 Business Process Server 3.5.1

This post contains the steps that are required to create a simple BPMN workflow that contains a Human Task. We will use the WSO2 Developer Studio to create the BPMN workflow and WSO2 Business Process Server to deploy and host the workflow.

If you have not used the above mentioned products, please visit the product pages of Business Process Server and the Developer Studio get a general idea about the products. Also please refer to the documentation of Business Process Server and Developer Studio for more information.


Note:
The default distribution of the WSO2 Developer Studio does not pack all the required plugins to create the BPMN workflows. Since the BPMN support for WSO2 Business Process Server was added by integrating Activiti engine 5.19.0, with the BPS Server. The Developer Studio should install the Activiti Eclipse Designer plugin in-order to create the workflows.


  1.  Installing the Activiti Eclipse Designer plugin in Developer Studio

    Navigate to
    Help --> Install New Software

    Add the Activiti repository by clicking on
    "Add" button

    Give the repository URL and the Name and install the
    "Activiti BPMN Designer" related components

    Name : Activiti BPMN Designer
    URL : http://activiti.org/designer/update/

  2. Create a new Activiti Project


  3. Once the Activiti Project has been created, then we need to create a Activiti Diagram. Use the previously created project as the project for the diagram we are going to create.


  4. Now we can start creating the workflow. We are only going to create a simple workflow that contains a Human Task. We are going to have 3 input fields to the workflow

    User Name
    Order Items
    Description

    The Human Task would display all 3 values for the user to take action. Then the process would exit with the user action. We do not do anything else from this workflow as the main intention is to give a detail explanation of how the human tasks can be configured.

    A Start task can be added easily by using the tools platter that comes when working on the Activiti diagram.


    Also we can define the inputs for our workflow by navigating to the "form" section under properties of the start task.

    A sample input definition is given below.


    The final output definition looks as below.

  5. Now lets add a "User Task", This can be found under the tasks section of the tools platter. The User Task signifies the human task that needs to happen.


    In the user task there are multiple configurations that needs to be done.

    - Configure the users/roles that the task needs to be assigned.
    The "main config" section under the properties allows us to define the users and roles that these tasks should be assigned to.In this example, we assign all the tasks for the "admin" user.

    In the main config section, the Assignee field defines the user name of the default assignee. Since we are assigning all these for the admin user in this example we set the value of that field to admin.
    The Candidate us...a separated) and Candidate gr...a separated) fields defines the list of users and roles that the tasks needs to be assigned respectively. A comma separated list of user names and roles names can be given to each filed respectively.

    - Configure the inputs and outputs to the User Task
    We have to define the inputs and outputs of the user task as we did for the start event. These inputs can be taken from the values that was received at the start of the workflow(or from any responses of the intermediate tasks if there were any).


    We can use the Variable field to define which variable we should take these values from.

    Similarly we can define the output values as well. We have defined the output as a enum type and defined 3 actions that the user can take.

    Approve
    Disapprove
    Discard


    The final input/output definition is as follows.

  6. We end the workflow by adding a End task. Also we have to give a meaningful name for the workflow we are creating. This can be done by clicking on the canvas area and changing the Name and Id fields under process section of properties.

  7. Now our simple workflow is complete and we need to create a deployable artifact out of that. This can be done by right clicking on the project(note that you have to be in the package view) and selecting the "Create deployment artifacts" option at the end. Once you complete this, a deployment artifact(OrderApprovalProcess.bar) would be created under the deployment directory of the project.

I will explain how to deploy this artifact in the Business Process Server and test it using the defaul bpmn-dashboard that comes with the product from my next post.

Monday, July 11, 2016

Unzip multiple files from Linux console

Many of you might have came across the situation where you had to extract multiple zip files. This can be done very easily from the Linux console.

When we unzip a file from the Linux console we use a command similar to the following.

unzip wso2am-2.0.0-BETA2.zip
In the same way, if you try to unzip multiple files using the same command,  the following error would we given.

unzip *.zip
Archive:  wso2am-2.0.0-BETA2.zip
caution: filename not matched:  wso2analytics-apim-2.0.0-beta2.zip
To overcome this issue of "filename not matched", we can simply use the following command. This command will unzip all the zip files in the current folder.

unzip '*.zip'

Friday, July 8, 2016

Force shutdown/Kill WSO2 Servers running in a Linux environment

In Linux there are multiple ways to force shutdown/kill all the process of a certain type. If we want to force shutdown all the WSO2 Servers that are running on a particular node, we can easily execute the following command.
killall java
The problem with the above command is that it will force shutdown all the java process running on that node which are not WSO2 specific.

The following command can be used to force shutdown or kill all the WSO2 servers that are running on a particular node and leave the other Java process intact.

ps -ef | egrep 'wso2' | mawk '{print($2)}' | xargs kill -9

How to Base64 Encode/Decode in Ubuntu command line

There are many situations where we need to get a Base64 Encoded string or a decode an already encoded string.

We can use the Linux command line to achieve this easily.

Encode a String: 


To Encode the string "admin:admin" we can use the following command.
echo -n 'admin:admin' | base64
This would give a result similar to the following.
YWRtaW46YWRtaW4= 


Decode a String:


To Decode the string "YWRtaW46YWRtaW4=" we can use the following command.
echo "YWRtaW46YWRtaW4=" | base64 --decode
This would give a result similar to the following
admin:admin 

Sunday, May 1, 2016

How to use Ready! API to test APIs published in WSO2 API Manager

In this post I'm going to explain on how we can use the Ready! API(SmartBear Software) to test API's that are published in the WSO2 API Manager.

WSO2 API Manager


WSO2 API Manager is a 100% opensource solution for designing and publishing APIs. It also has the capability to create and manage a developer community. The core of the WSO2 API Manager is created using the WSO2 Enterprise Service Bus, Identity Server and Governance Registry components.

Ready! API


Ready! API is a product that is developed by SmartBear software which includes a platform of tools such as SoapUI NG Pro, LoadUI NG Pro, Secure Pro and ServiceV Pro that can be used to effectivly test API functinality. A more detailed description about these products can be found using their product page.


This post focus more on the Ready API Plugin usage and not WSO2 API Manager product functionalities. If you are new to WSO2 API Manager, I suggest you to go through our product page and documentation to get an idea about what WSO2 API Manager is and how to use it.


Ready! API has an extension point where people can create a plugin and alter the behavior of the product. WSO2 Team has created a plugin(named WSO2 API Manager Plugin)  for Ready API which helps the users to Integrate and Test their APIs that are visible in the WSO2 API Store. This blog post focuses on describing the features and advantages of the plugin.


WSO2 API Manager Plugin


Installation


The WSO2 API Manager Plugin is published in the Ready API Plugin repository. Hence installing the plugin can be done using following a simple set of steps. 

  1. Navigate to the Plugin Manager.
  2. Click on  "Browse Plugin Repository".
  3. Select the "WSO2 API Manager Integration" Plugin and click Install.
The following screenshot shows the above mentioned steps.


Usage

Once the plugin is installed, there are multiple ways to get the advantage of the plugin.

1. Create a project by importing a new API.
2. Add a new API to an already existing project.


When using both of the above mentioned options, you would see a prompt to enter the API Store connectivity details. What we need to do is to fill in the details and press the "OK" button. Note that the tenant domain field is not required if you are connecting to the super tenant store as the plugin will connect to the super tenant store if the field is not specified. 


After the above step, the plugin will connect to the API Store(give by the user) and list out all the APIs in its API list prompt.


The user only has to select the API(can select multiple APIs) and whether to create a test suit and a load test for the API. The plugin will connect to the API Manager instance using the REST APIs of the API Publisher and Store and will create a project by reading the swagger definition of the API(or APIs). The final outcome would be something similar to the following.


As you would notice, the plugin reads the Swagger definition and create a project with the sample requests. The plugin also creates an OAuth2 authorization profile with the name "wso2-api-manager-default" so that the end users would only need to give the OAuth2 token that they generated from the API Manager Store.

Once the API import is complete, the usage of the plugin is really simple. The user only needs to give the OAuth2 token to the "Access Token" field and fill in the necessary request parameters before invoking the sample request.

The response would look like what is stated in the image below.


As shown in the above steps, you could import any number of APIs from the API Store and test them using the Ready! API. Similar to the project created in SoapUI NG Pro, there would be projects created on LoadUI if the user has selected that option when importing the APIs.

Summary


The WSO2 API Manager plugin in the SmartBear plugin repository was developed to have a seamless experience when testing the APIs published in the WSO2 API Manager using Ready! API Platform. In summary the current plugin supports the listing of APIs in the given Store, creating sample requests for the selected APIs by reading their Swagger definitions and create test suits and load tests if that option was selected and many more features.

For more information about the plugin usage, please refer to this article and the Github project for the plugin.